Key Takeaways
- Warm-toned makeup helps your skin appear sun-kissed and radiant.
- Golden hour-inspired shades revolve around soft gold, peach, and bronze.
- A smooth base pairs well with strategic bronzer and highlighter placement.
- Blending techniques ensure a seamless transition of warm hues.
- Soft but defined eyes, peach-tinted cheeks, and glowy lips build a harmonious look.
- Lightweight skincare prep enhances comfort and wear time.
- Thoughtful product choices and targeted application make each feature pop.

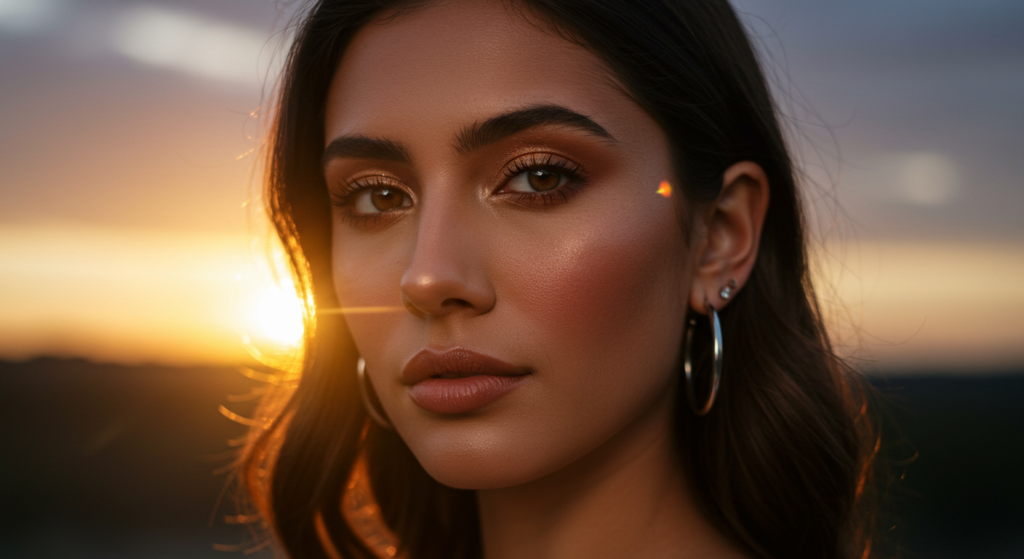
When the sun dips low and paints everything with that shimmering light, many of us wish our faces could hold that gentle, golden warmth all day. Golden hour makeup makes it possible by blending warm tones and sunlit radiance into a single, flattering look.
Whether you have oily skin, dry skin, or anything in between, you can adapt these techniques and products for a healthy, glowing appearance. If you’ve been wondering how to brighten up your complexion, emphasize your features, and lean into the latest makeup trends, this guide covers every detail.
Think of it as your warm-hued roadmap. You’ll see which products offer that sun-kissed effect, how to blend them, and ways to adjust for any skin tone.
You’ll learn about everything from the right foundation undertones to the best peach or terracotta blush. You’ll also see how eye makeup can match your soft, gilded vibe, including shimmering lid colors and subtle definition that doesn’t overpower your features.
We’ll discuss strategic contouring, highlight placement, and skin-prep steps you can follow to make your makeup last under everyday light or actual sunset lighting.
We’ll dig into bronzers, tinted balms, and more. By focusing on the steps that matter—like picking colors that match your undertone or layering creams for a soft glow—you’ll be able to get that luminous effect with confidence. Let’s dive in and build a sunlit glow that fits your style.
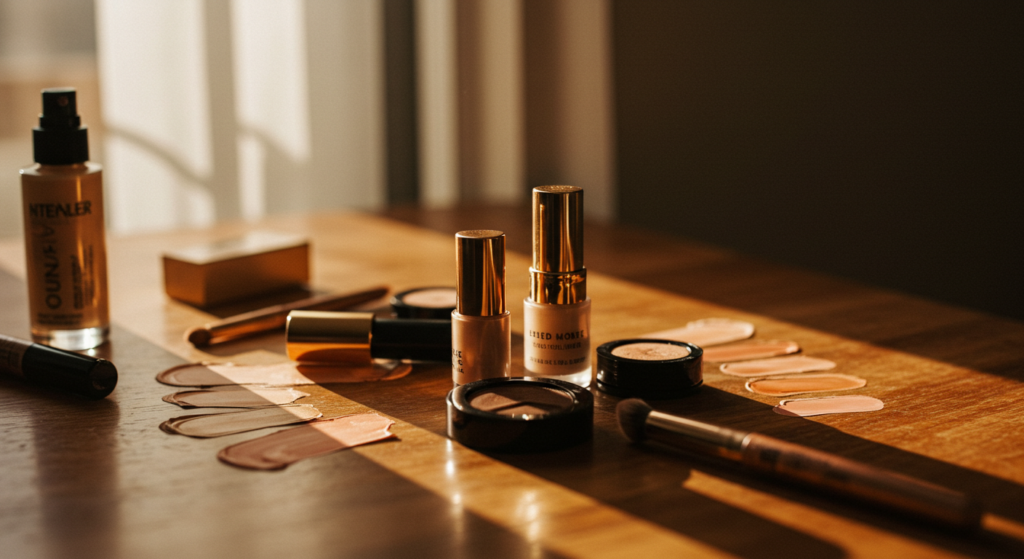
Skin Prep for a Smooth Canvas

Gentle Cleansing Ritual
A comfortable base starts with clean skin. Choose a gentle facial wash that removes oils, dirt, and leftover products. Look for formulas labeled non-stripping or hydrating, so you don’t lose essential moisture. If you skip proper cleansing, you risk dullness, clogged pores, or uneven makeup later.
Massage the cleanser into your skin with circular, upward motions. Take your time around the nose and jawline, where residue tends to hide. Rinse thoroughly with lukewarm water—steer clear of hot water, which can dry you out. Pat (not rub) your face with a soft towel, leaving the surface slightly damp for the next steps.
Hydrating Toner and Serum
After cleansing, apply a hydrating toner that balances your skin’s pH and preps it for serums. Ingredients like rose water or chamomile can soothe, while hyaluronic acid draws in moisture. Tap the toner into your skin gently—avoid tugging or pressing too hard.
Next, use a lightweight serum with brightening properties. Vitamin C is popular for an overall glow, and niacinamide helps refine pores. One or two drops should be enough. Spread it evenly, then let your skin absorb it for a minute or so. This layering approach helps ensure each product does its job.
Lightweight Moisturizer and SPF
A light moisturizer will keep your skin supple under the rest of your makeup. Pick a formula that suits your skin type. If you’re on the oily side, consider a gel-based hydrator. If you’re drier, go for a richer cream but keep it light enough to avoid greasiness.
Don’t skip sunscreen. A broad-spectrum SPF 30 or higher shields you from UV rays that cause hyperpigmentation and wrinkles. For a golden hour look, you want an even, protected surface. Wait a minute or two after sunscreen before you move on to primer or makeup. Giving each step time to settle reduces pilling and patchy spots.
Primer and Foundation Basics

Choosing a Radiance-Boosting Primer
A radiance primer can enhance that golden glow you crave. Look for formulas with pearlescent or light-reflecting particles. Aim for a subtle sheen, not a glittery finish. If you have combination skin, focus the primer on areas you want to highlight, like the high points of your cheekbones or your forehead’s center.
Spread a small amount of primer using your fingertips or a soft makeup brush. Concentrate on areas where you’d like a bit more shine. Be careful with T-zone application if you’re oily, since too much luminosity there might border on greasy. A strategic approach yields a balanced glow.
Picking the Right Undertone
When creating a golden hour makeup look, foundation undertone matters. Warmer shades complement this theme best. That doesn’t mean you must jump to an orange hue if your skin is cool-toned. Instead, find a foundation that matches your actual undertone but leans slightly warm. For neutral skin, a lightly warm foundation can add subtle warmth.
If you’re uncertain about your undertone, examine your veins in natural light. Greenish veins often point to warm undertones, whereas bluish veins may suggest cooler tones. Neutral undertones can have a mix of both. Match your chest or neck if your face is prone to redness. A proper color match maintains a seamless flow from face to body.
Applying Foundation for a Soft Glow
Use a damp makeup sponge or a kabuki brush to apply your chosen foundation. Start by dotting a small amount on your cheeks, forehead, and chin, then blend outward. The key is to avoid cakiness. You want a thin, breathable layer, allowing your natural skin to peek through.
In areas that need more coverage (like stubborn redness around the nose), add a second light layer. Pat it in gently rather than swiping, which can move the product around. If you need even more coverage, rely on a concealer instead of layering on heavy foundation. That way, you preserve the fresh, sunlit vibe.
Subtle Concealer Techniques

Color Correcting for Dark Circles
Before you conceal, you might need a color corrector if your under-eye area shows deep shadows. Peach or salmon-colored correctors often work well on bluish or purple tones. Tap a tiny amount where the discoloration is most obvious, but don’t overdo it. You still want the skin to look natural.
After applying the corrector, wait a few seconds to let it settle. Then use a damp sponge or a small brush to blend it gently. You should see a slight neutralization of the dark hue. You can then follow up with your regular concealer to match the surrounding skin tone.
Choosing a Lightweight Formula
For a golden hour look, an ultra-thick concealer can weigh your skin down. A lightweight, creamy concealer often works best. Pick one that gives you medium coverage without an overly matte finish. Spot test it on your wrist if you’re not sure about how it feels or appears in natural light.
Apply small dots of concealer beneath the eyes, around the nose, or on blemishes. Blend it out in soft tapping motions with your ring finger or a tiny brush. Keep the coverage localized to prevent a heavy look. If your skin is well-prepped, you’ll need less product to cover imperfections.
Strategic Placement for Brightness
Golden hour makeup thrives on brightness in the right spots. After concealing, you can add a touch of extra highlight just below your eyes, near the nose bridge, and at the center of your forehead. Choose a concealer one shade lighter than your natural skin tone for these areas.
Blend carefully, so there’s no harsh line between this lighter shade and your base foundation. This subtle technique draws light to the center of your face. It also contrasts nicely with the warm bronzer you’ll use later, enhancing that sunshine-kissed look without washing you out.
Setting the Base

Lightweight Powder Application
A translucent setting powder or a warm-tinted powder helps lock in your base. If you have oily skin, lightly dust your T-zone. If you’re dry, stick to the smallest amount possible. Focus on places where concealer tends to crease, like under your eyes or around your mouth.
Use a fluffy brush. Tap off excess powder before applying, then swirl it lightly over your skin. If you want to keep the glow, avoid piling on powder everywhere. You can revisit this step after your bronzer or blush if you notice shine that’s too strong.
Baking for High-Humidity Days
If you live in a hot climate or plan to be out in the sun, baking can help. This technique involves pressing a heavier layer of powder onto areas like the under-eyes or jawline. Let it sit for a minute or two, then dust off the excess. Baking can make your concealer stay put longer, although it does add a matte finish.
Use it sparingly for a golden hour look. Over-baking can dull the glow you’re aiming for. If you do bake, confine it to the places you need extra staying power. That approach keeps the rest of your face looking fresh.
Avoiding Overly Matte Finishes
A classic warm glow shouldn’t feel flat. If you’re prone to dryness or want more luminosity, consider a finishing spray or a light mist. Hold the bottle a few inches from your face and spritz once or twice. This step helps powders melt into the skin for a more natural finish.
If you notice any cakey patches, you can gently pat them with a clean makeup sponge dampened with setting spray. That extra bit of moisture can reduce powdery texture. The result is a more cohesive base that feels comfortable and looks like real skin.
Bronzer for Sun-Kissed Warmth

Powder vs. Cream Bronzers
Bronzer is key for that golden hour aura. You can go with either powder or cream. Powder bronzers are quick to apply and often easier for beginners. Cream bronzers give a skin-like finish that’s especially popular for glowy makeup. Whichever you choose, pick a shade one to two steps deeper than your natural skin tone, in a warm undertone.
If you opt for cream, apply it with a duo-fiber brush or a damp sponge. Work in gentle, circular motions. For powder, use a fluffy bronzer brush that diffuses color evenly. Start with less product and build up as needed.
Defining Your Face Shape
The trick is to place bronzer where the sun would naturally hit. Dust it or blend it into the temples, hairline, and just below your cheekbones. If you want extra definition, you can sweep a hint under your jawline. Keep the color subtle. Harsh lines will clash with the soft golden look.
Blending is essential. You don’t want to see obvious demarcation or muddy streaks. Swirl your brush in small circles, gradually pushing the color into your skin. If you’re uncertain about how much bronzer to use, stand near a window or use bright lighting to check your progress. Golden hour style is best when it looks seamless.
Bringing It to the Neck and Ears
Sometimes people forget the neck and ears, which can appear lighter compared to a sun-kissed face. A quick dusting of bronzer ties everything together. Lightly buff the bronzer on the edges of your face and down your neck to avoid a makeup “mask.”
Tap off excess powder or use whatever is left on your brush to warm up those areas. If you’re using a cream, switch to a fluffier tool or even your fingers for gentle blending. You only need a small amount—enough to match the tone of your face.
Blush in Peach and Terracotta Tones

Picking a Shade That Suits Your Undertone
Blush adds a rosy, lively touch to your warm makeup. Peach blushes flatter many skin tones. If you have medium or deep skin, a terracotta or warm berry shade can create a richer warmth. The goal is a soft, flushed effect that compliments your bronzer without overshadowing it.
Try different shades on the back of your hand or your wrist. Choose something that melts into your skin when blended. A golden or peach shimmer in the blush can amplify the glow, but if you prefer matte, that’s also fine. The main idea is to avoid cool pinks that clash with the rest of the warmth.
Application Method for a Natural Flush
Use a soft, tapered brush to pick up a small amount of blush. Smile slightly to find the apples of your cheeks. Start at the apples, then sweep the blush upward toward your temples. Keep the blending light, so there’s no harsh edge between your blush and bronzer.
If you’re worried about going overboard, tap your brush on a tissue first. You can always add more, but it’s tricky to remove excess color without disturbing your foundation. If you end up with too much blush, a clean powder brush or sponge can diffuse it.
Layering Cream and Powder Blush
For a long-wearing flush, consider layering a cream blush under a light dusting of powder blush. It might sound like a lot, but if you keep both layers sheer, they can create a dimensional effect. Start with a small dab of cream, blend it well, and then top it with a matching powder shade.
This technique locks color in place. It’s especially handy if you’re attending an event or spending time outdoors. Just remember to use a minimal amount of each product, so your cheeks remain glowy, not overloaded.
Highlight Placement for a Golden Sheen

Choosing a Warm Highlighter Shade
A golden hour look craves a warm-toned highlighter. Skip frosty or silvery highlights. Instead, go for champagne, soft gold, or peachy-gold undertones. The shimmer should look like a gentle beam, not a glitter storm. This subtle shine pairs better with that sunlit style.
Check the formula under different lighting. A highlight that appears perfect indoors might look stark in daylight if it’s too pale or too chunky. Some popular products feature finely milled pearls that melt into the skin. Test before you commit.
Spots to Highlight
Focus on the tops of your cheekbones, the bridge of your nose, and your brow bone. These are high points that light hits naturally. For extra gleam, add a tiny touch to your cupid’s bow or the tip of your chin. Avoid going overboard if you have texture or large pores in those areas, as shimmer can emphasize them.
Use a small, precise brush or even your fingertip. Tap gently. Then blend so the highlight seems like part of your skin. The idea is to replicate that twilight glow, not a disco ball effect.
Creating a “Lit from Within” Glow
To amplify the vibe, consider layering a liquid illuminator under your foundation. Mix a drop into your foundation or apply it directly to the high points of your face before foundation. Follow up with a powder highlight at the end. This two-step approach yields a deep, multi-dimensional sheen.
If you try this layering technique, keep each layer thin. The combination of different reflective formulas can look magical, but only when done delicately. The final result is a sophisticated warmth that radiates from within.
Eye Makeup Essentials

Warm-Toned Eyeshadow Palette
A warm-toned palette usually includes shades like gold, bronze, copper, terracotta, and perhaps a few neutral browns for blending. Look for a palette that offers shimmer and matte options. Shimmery gold or bronze can go on your lid, while matte browns or orange-toned shades can define the crease.
Start by buffing a soft brown or peach into the crease as a transition color. Then pat your chosen shimmer over the center of the lid. Deepen the outer corner with a slightly darker hue for dimension. Keep the darkest shades to the outer V to avoid closing off the eye.
Soft Definition with Eyeliner
Instead of harsh black liner, try a brown or bronze eyeliner. This complements the warm eyeshadow. Line your upper lash line, then smudge it gently with a small brush or your fingertip for a smoky effect. You can also line your lower lash line lightly and diffuse it to maintain that soft, warm vibe.
If you want a bit more drama, create a subtle wing with the brown liner. Flick it outward just a bit. The result should look effortless, not overly sharp. If your eyes feel too round, a soft wing elongates them slightly.
Mascara and Lash Enhancements
Use a volumizing or lengthening mascara to define your lashes. Apply one to two coats, focusing on your outer lashes to accentuate the warm eyeshadow. Comb through any clumps with a clean spoolie. For extra flutter, pop on some delicate, wispy falsies. Pick a style that isn’t too thick or long. You want the eyes to shine without dominating your entire look.
If you prefer a more natural finish, skip falsies and curl your lashes instead. A good curl can open your eyes. Brown mascara is an option if you’re aiming for an even softer effect. The key is to keep your eyes in harmony with the rest of your warm-hued face.
Defining the Brows

Shaping and Grooming Basics
Brows frame your face. A messy brow can distract from the warmth and glow you’ve built. Start by brushing them upward with a spoolie. Snip any long hairs that stick out. Pluck stray hairs that sit far outside your natural shape, but resist over-plucking. A full, groomed brow often balances warm makeup nicely.
Filling in Sparse Areas
Pick a brow pencil or powder that matches your hair color. Lightly fill in gaps with small, feathery strokes. Mimic the direction of natural hair growth. Avoid a blocky, drawn-on effect. If your brows are already thick, you might just need a translucent gel to hold them in place.
After filling, brush through your brows again. This step blends the product. If you see any harsh lines, use a clean cotton swab or spoolie to soften them. For maximum hold, finish with a brow gel or clear mascara. That ensures your shape stays put throughout the day.
Highlighting the Brow Bone
You can enhance the space beneath your brow with a light matte or subtle shimmer shade. That highlights the arch and makes your eye makeup pop. Avoid using a frosty white color, as that can appear stark against the warm tones. Instead, choose a light beige or soft champagne.
Apply it with a small brush, focusing on the highest point under your brow. Blend downward into your transition shade to avoid a harsh line. This technique adds dimension without overshadowing the rest of your golden makeup.
Lip Color Selection

Finding Complementary Warm Shades
For a golden hour look, lipstick shades in the peach, nude, or warm coral range work beautifully. Choose a tone that suits your skin depth. Lighter complexions might like soft peach or rosy nude. Deeper complexions often flourish with a spicy terracotta or warm cinnamon. If you want something bolder, a burnt orange or brick red can play off the overall warmth.
Gloss, Satin, or Matte?
Your lip finish depends on personal taste. A glossy finish amplifies shine. A satin finish strikes a balance between hydration and subtle glow. A matte finish can also blend in if it’s not too flat or dry. For golden hour vibes, a satin or creamy texture often fits best. Gloss, when done lightly, can reflect light similar to how the sun bounces off a golden horizon.
When in doubt, test multiple textures. Some people enjoy layering a gloss over a matte lipstick to get the best of both worlds. The main objective is to keep your lips looking healthy and in harmony with the rest of your face.
Lip Liner for Definition
A lip liner that matches your chosen lipstick prevents the color from bleeding. It also sharpens your lip shape. Trace the outline of your lips, then fill them in a bit. This creates a base layer that helps your lipstick last longer.
If your lips tend to dry out, prime them with a thin layer of balm first. Blot the excess so it doesn’t interfere with the lip liner. With a stable foundation, the color stands out more and stays put. That means fewer touch-ups and more time glowing in the sunlight.
Finishing Touches and Setting

Spot Concealing and Final Blending
Now that most of the color is on, step back and check your makeup in natural light if possible. Do you see any dark spots that need extra coverage? Grab a small concealer brush and dab a tiny bit of product where necessary. Blend lightly so you don’t mess up your existing work.
If you see any uneven lines or patches, use a clean blending brush or sponge. Softly diffuse edges. The entire face should look unified. No abrupt transitions between your bronzer, blush, and highlight.
Choosing the Right Setting Spray
A luminous setting spray can lock everything in while keeping that glow. Shake the bottle gently, hold it an arm’s length away, and spritz in a circular motion over your face. Close your eyes and lips during application to avoid a mouthful of mist.
If you prefer a longer wear time and have oily skin, pick a long-lasting or mattifying setting spray instead. Focus it on your T-zone. You can even do a two-spray combo: a matte option on the T-zone, a radiant one for the outer perimeters. The final effect is balanced and suitable for extended wear.
Jewelry and Hair Considerations
Your final look isn’t just your makeup—it’s the entire presentation. Warm-toned jewelry like gold earrings or layered necklaces can accentuate that sunlit vibe. If you prefer silver or rose gold, that’s still fine, but gold complements these makeup shades especially well.
As for hair, soft waves or a loose updo can frame your glowing face without drawing away attention. If you have an elaborate hairstyle in mind, confirm it complements your warm color scheme. The aim is to create a cohesive style where every element feels in sync.
Warm Daytime Variation

Sheer Coverage Base
For a daytime version of golden hour makeup, lighter coverage can feel more comfortable. Swap your medium-to-full coverage foundation for a tinted moisturizer or a BB cream. The warmth of bronzer and blush will still stand out, but your skin will breathe more.
Use your fingers or a buffing brush to spread the product quickly. This low-key approach suits casual outings or beach events where you want a glow but not the full-face effect. If you spot areas needing more coverage, dab a bit of concealer only there.
Muted Eye and Lip Tones
Opt for soft browns and peach shades on the eyes, and avoid deep or intense colors. A quick wash of color across the lid plus a swipe of mascara can still evoke the golden hour vibe without feeling heavy. Try a tinted lip balm or a sheer lipstick for your lips. The subtle tone aligns with a sunny-day aesthetic.
If you want a tiny glow on your lids, a nude or pale gold shimmer can brighten things up. Blend well to keep it understated. A warm nude eyeliner on your lower waterline can also make you look more awake.
Simplified Highlight
If you’re out in bright daylight, a toned-down highlight can look better than a striking metallic. Use a cream highlighter and tap it lightly along your cheekbones. If you’re wearing a tank top or an off-shoulder outfit, you can even apply a bit on your collarbones or shoulders. The sparkle should remain gentle. You’re aiming for a faint suggestion of golden light.
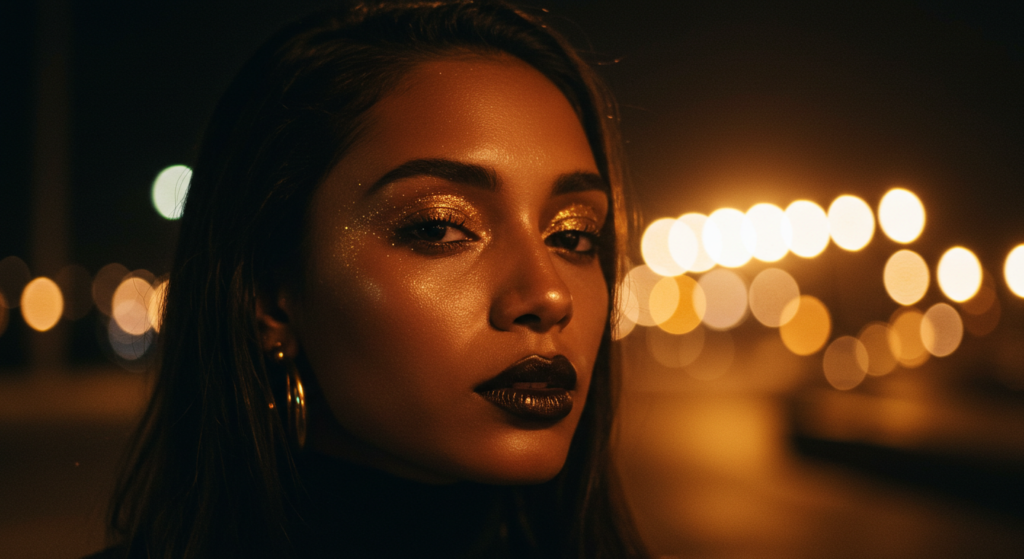
Amping It Up for Evening
Deeper Contour and Bronzer
For an evening event, you might want a more dramatic shape. You can reach for a slightly deeper bronzer to chisel your features. A small contour brush helps you place product precisely beneath your cheekbones, at your temples, and along the sides of your nose if you desire a sharper look.
Blend carefully so there’s no harsh division. If you go too dark, add a touch of setting powder on top to tone it down. This step elevates your features under soft indoor lighting or those dim sunsets.
Bolder Eye Shimmer
Nighttime is your chance to use a bolder shimmer on the lids. Think of a rich gold or a metallic copper. Apply it with a damp eyeshadow brush to boost intensity. You can also layer a pressed glitter or foil eyeshadow in the center of your lid for that extra gleam.
Line your eyes with a black or dark brown liner for a bit more drama. A crisp wing can stand out, especially if you wear false lashes. If you do go heavier on the eyes, remember to balance your lips—maybe a neutral but warm hue so your focus stays on the eyes.
Glossy Lips or Deep Lip Color
For an evening take, either go with a super glossy lip in a nude shade or jump to a deeper color like burnt orange or a warm burgundy. Line your lips well to prevent feathering. A slightly glossy top coat can add fullness. If your eyes are super bold, a warm nude might complement the look best. If your eyes are moderate, a deeper lip can be the star.
Product Suggestions and Trends

Trending Warm-Toned Palettes
- Urban Warm Glow: Includes gold, peach, and tan shades.
- Sunset Shimmer Collection: Offers a balanced mix of matte and glimmer shades, known for rich pigmentation.
- Golden Dream: Features a variety of coppery and champagne hues for versatile day-to-night looks.
Popular Blush and Bronzer Options
- Peach Prism Powder Blush: Softly pigmented, perfect for that fresh flush.
- Terracotta Touch Cream Blush: Warm undertones that blend smoothly.
- Radiant Bronze Pressed Powder: A reliable bronzer with a hint of shimmer.
Lip Colors for a Sunlit Glow
- Peachy Glow Balm: Lightweight, adds shine without feeling sticky.
- Warm Coral Cream Lipstick: Vibrant but not overbearing.
- Rusty Nude Liquid Lip: Satin finish, suitable for evening glamour.
Skincare Maintenance Tips
Nightly Cleansing Routine
After wearing warm makeup all day, it’s crucial to properly remove every trace. Use a cleansing oil or balm to break down stubborn products. Follow with a gentle facial wash to clear away residue. This prevents clogged pores and keeps your skin ready for future golden hour looks.
Hydration and Masking
Warm makeup sometimes leans on powders and shimmer. Counteract dryness by applying a hydrating mask once or twice a week. Formulas with ingredients like aloe vera or hyaluronic acid can replenish moisture. If you have congested pores, rotate in a clay or charcoal mask, focusing on trouble spots.
Consistent Sun Protection
Even if you love that sunlit glow, remember the long-term benefits of sunscreen. Exposure without protection can lead to dark spots and uneven texture. Keep using SPF daily, and consider reapplying with a powder sunscreen if you spend hours outside. Healthy skin beneath your makeup is what truly delivers the best glow.
Tips for Different Skin Types

Oily or Combination Skin
- Use an oil-control primer in the T-zone.
- Choose powder-based products to avoid excess shine.
- Keep blotting papers or a mattifying powder on hand for touch-ups.
- Focus shimmery highlights on the outer portions of your cheeks.
Dry or Dehydrated Skin
- Opt for cream or liquid formulas for bronzer, blush, and highlight.
- Prep with a rich moisturizer or hydrating primer.
- Mist your face throughout the day with a facial spray.
- Choose a dewy foundation that won’t cling to dry patches.
Sensitive or Acne-Prone Skin
- Look for non-comedogenic products.
- Do a patch test when trying new formulas.
- Avoid heavy fragrances or harsh chemicals.
- Emphasize gentle blending to reduce irritation.
Common Mistakes to Avoid
Overpowering with Bronzer
Applying too much bronzer can create a muddy or orange cast, especially under certain lighting. Always build color in layers and blend thoroughly. If you go overboard, a bit of translucent powder on top might soften the effect.
Skipping Blush
Some assume bronzer alone can provide color. However, the pop of blush is vital for a natural, dimensional look. Without it, your face might look flat or overly bronzed. A warm peach or terracotta flush ties everything together.
Neglecting Lighting Checks
Golden hour-inspired makeup might look perfect in your bathroom mirror, but how does it appear in daylight or warm evening light? Always check your final result in multiple lighting conditions. That extra step prevents surprises when you step outside or into a different room.
Adapting the Look for Special Occasions

Weddings and Formal Events
When you need this warm vibe for a wedding, focus on long-wearing formulas. Prime effectively and layer your products lightly. A slightly bolder highlight and a refined lip can elevate your appearance for photos that capture the glow.
Beach or Outdoor Parties
Try using waterproof or water-resistant products if you’ll be near the ocean or pool. A tinted moisturizer with SPF, cream bronzer, and a soft blush can keep you looking radiant without too much fuss. Don’t forget a setting spray formulated for humidity and heat.
Work Functions or Luncheons
Dial it down slightly by skipping heavier shimmer on the eyes. Instead, opt for a neutral matte lid with a hint of gold near the lash line. Pair with a creamy lipstick in a modest shade. This polished variation still shows warmth but remains office-friendly.
Summary Table

Below is a handy table for quick reference. It highlights the main steps and suggestions to master your golden hour look:
| Step | Key Action | Product Type | Tips |
|---|---|---|---|
| Skin Prep | Cleanse, Tone, Moisturize | Gentle Cleanser, SPF | Keep it lightweight but well-hydrated |
| Primer & Foundation | Radiant Primer, Warm Undertones | Radiance Primer, Liquid Foundation | Focus on subtle glow, thin layers |
| Concealer Technique | Color Correct if Needed | Lightweight Concealer | Tap lightly, blend with damp sponge |
| Set the Base | Translucent Powder, Light Bake | Loose or Pressed Powder | Avoid heavy matte; keep T-zone in check |
| Bronzer Application | Warm, Sun-Kissed Placement | Powder or Cream Bronzer | Dust along temples, cheekbones, jawline |
| Blush Selection | Peach or Terracotta Hues | Powder or Cream Blush | Start at apples, blend upward |
| Highlight Placement | Warm Champagne or Gold | Powder or Liquid Highlighter | Top of cheekbones, brow bone |
| Eye Makeup Essentials | Warm Browns, Copper, Gold | Warm Eyeshadow Palette | Blend shimmer on lid, smoke out corners |
| Brows | Feathered, Natural Shape | Pencil or Brow Powder | Small strokes, groom with spoolie |
| Lips | Warm Nude, Peach, or Terracotta | Lipstick, Gloss, or Balm | Line for definition, pick comfy finish |
| Setting & Sprays | Fix Makeup Without Dulling Glow | Radiant Setting Spray | Spritz lightly, check even coverage |
| Daytime Variation | Sheer Coverage, Muted Shades | BB Cream, Tinted Balm | Soft highlight, minimal shimmer |
| Evening Amplification | Deeper Contour, Metallic Lid | Rich Eyeshadow, Bold Lip | Increase intensity for dramatic flair |
| Special Occasions | Long-Wearing Formulas, Photo-Ready | Waterproof, SPF Mix | Layer lightly, adjust for environment |
Conclusion
Warm, sunlit makeup isn’t about piling on products. It’s about strategic choices that honor the gentle glow we see when the day transitions to evening.
By combining radiant skin prep with carefully selected warm tones for your face, eyes, and lips, you can capture that gorgeous, golden aura whenever you like.
Blending matters just as much as product choice. Small details—like matching your foundation undertone, placing your highlight correctly, and adding a soft pop of blush—bring out the best in this look.
Remember that balance is vital. If you go bold on the eyes, keep the lips subtle, and vice versa. Always think about how each element interacts with the others.
Once you’re satisfied, lock everything in with a suitable setting spray, and do a final check in natural light if you can. Follow these guidelines, adapt them to your skin type, and you’ll be prepared to wow everyone with that timeless golden glow.
FAQ
How do I pick the right golden highlighter for my skin tone?
Opt for a highlighter that’s one or two shades lighter than your skin. If you have a deep complexion, choose a rich, bronze-gold highlight. For lighter skin, a pale gold or champagne works well. Make sure it has warm undertones that blend with your look.
Can I wear golden hour makeup if I have cool undertones?
Yes. Look for neutral-warm products, which add warmth without turning orange. Try a foundation that leans slightly warm but still matches your natural tone. For blush and bronzer, choose less intense warm shades that harmonize with cool or neutral undertones.
How do I prevent my makeup from melting in hot weather?
Primer is your friend, as is setting spray. Opt for sweat-proof or waterproof formulas for your foundation, eyeliner, and mascara. Blotting papers can help manage excess oil, and a light dusting of translucent powder can soak up shine before it gets out of hand.
Should I use shimmer or matte eyeshadows for a golden hour look?
You can use both. Shimmers in gold or copper highlight the lid, while matte browns create definition in the crease. This combination gives a dimensional effect. If you prefer a subtle finish, stick to satin or lightly shimmering shadows.
Is cream blush better than powder for a glowy look?
Cream blush gives a dewy finish, while powder blush can also look natural if it’s finely milled. Each has its advantages. Cream formulas often blend seamlessly into the skin, making them popular for a golden glow. Powder blush is convenient and stays put well, especially if layered over a good base.
How often should I refresh my makeup throughout the day?
It varies. Carry a setting powder or blotting sheet if you have oily areas. A quick reapplication of lip color might be all you need if you’ve used stable products elsewhere. If you notice fading, gently buff or tap some product back on top, but avoid layering too much on an already warm day.
What if my bronzer looks too orange?
Use a clean fluffy brush or a damp sponge to diffuse the color. Then dust a hint of translucent powder over it. You can also try a neutral or slightly cooler bronzer next time. Finding the right shade can take experimentation, so don’t be discouraged.
Enjoy capturing that glowing moment on your face, and keep experimenting until you’ve perfected your personal golden hour style!
Joanna Perez, with a degree in Creative Writing, excels in recommending distinctive clothing color mixes and trends that deeply connect with readers. She simplifies the often daunting task of color selection, making fashion decisions more personalized and impactful. Her passion for vibrant color palettes and the stories they tell makes her an indispensable voice in the fashion community.
Reviewed By: Marcella Raskin and Anna West
Edited By: Lenny Terra
Fact Checked By: Sam Goldman
Photos Taken or Curated By: Matthew Mansour
