Key Takeaways
- Know Your Undertone: Warm, cool, or neutral undertones impact which highlighter shades will look natural or clash with your complexion.
- Start Subtle: Use lighter strokes and build color slowly to avoid looking sparkly or chalky.
- Texture Matters: Powder, cream, and liquid highlighters each create a different effect. Test several formats to find your ideal glow.
- Skincare Prep: Smooth, hydrated skin helps highlighter blend without harsh lines.
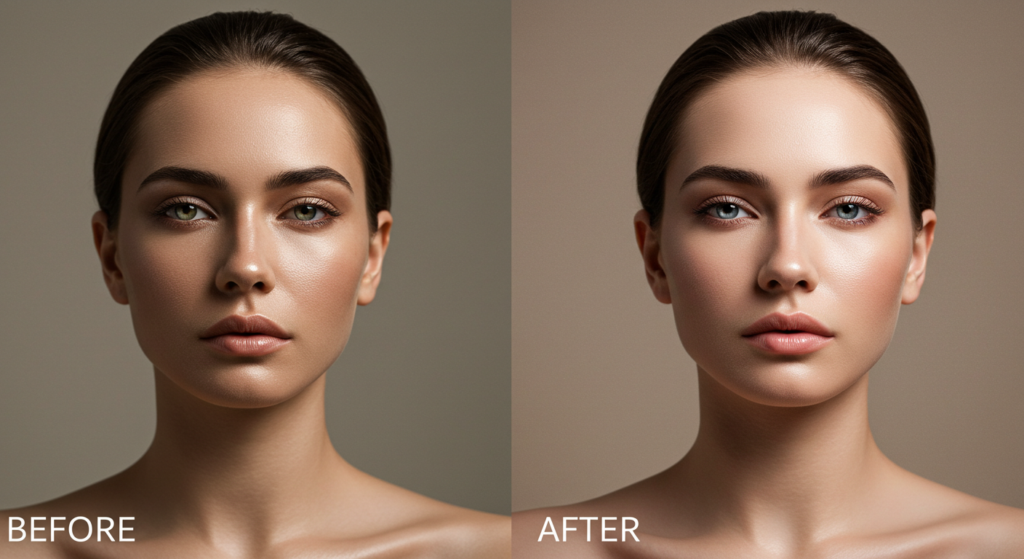
- Proper Placement: Target your cheekbones, brow bones, and other high points for a lifted appearance.

You want to amp up your radiance, right? Highlighter can bring magic to your face by catching light in flattering ways. It’s not about glitter or shine alone—strategic highlighting makes your cheekbones pop, enhances your eyes, and wakes up your entire look.
If you’re confused about picking the right color, you’re not alone. Who hasn’t picked up a gorgeous-looking pan of shimmery product, only to end up with a frosty or grayish cast on the skin?
People often assume that highlighter is only for fair tones. That’s untrue. Highlighter can flatter any complexion when you select the correct hue and undertone. The trick is figuring out how to choose and then knowing the best techniques to apply.
Are you worried you’ll overdo it? Maybe you’ve seen photos where the person looks like a disco ball. Fortunately, you can avoid that scenario by building from subtle to radiant in small steps.
In this article, we’ll break down color choices, undertones, and formulas so you can select the right product for your face. We’ll also cover clever strategies for layering and finishing techniques. Each skin tone group has specific needs—fair, light, medium, olive, tan, deep, and dark all have different sweet spots in terms of highlight color.
Let’s explore ways to highlight that give you a glow, not a glare. You’ll learn about powders versus creams, best application tools, and the importance of skin prep.
No more random guessing. Instead, you’ll have a strategy to keep your skin shining in the most natural, eye-catching way. Keep reading for some insider tips that will help you master the art of highlighting, regardless of your complexion.
Understanding Highlighters

Highlighter 101
Highlighter is a makeup product that reflects light. You’ll typically find it in powder, liquid, or cream form. The simplest way to envision it is as a glowy topcoat for areas you want to bring forward. It usually contains finely milled shimmer that bounces light off your skin’s surface. Some formulas are subtle and satin-like, while others feature intense sparkle for a dramatic effect.
What’s so special about it? Highlighter can add a fresh glow without heavy coverage, unlike a full-coverage foundation or concealer. It brightens specific points on the face—top of cheekbones, brow bones, cupid’s bow—wherever you want the eye to focus. If you’ve ever admired a dewy complexion in a magazine, highlighter might be the secret weapon behind the scenes.
Benefits of Highlighting
Highlighting adds dimension. It helps your face avoid looking flat under harsh lighting or in photos. Another plus: it can act like a subtle facelift. When you place a soft shimmer on higher planes, it pulls attention upward, making the face look lifted. That’s why many makeup artists use it to give clients a youthful radiance.
Highlighter also pairs beautifully with contour. When you darken areas you want to push back, and brighten the parts you want to bring forward, you create a sculpted effect. It’s a technique that’s been popular on runways for years. Now, it’s available to anyone who loves to experiment with makeup at home.
Myths About Highlighting
One myth is that highlighter only looks good on young, smooth skin. Another myth is that glittery formulas are the only way to glow. Neither is true. A fine, luminous sheen can look stunning on mature skin if applied thoughtfully. And there are non-glittery products on the market that rely on luminous pearl particles instead of big sparkles.
Some might think highlighting is only for special occasions. Actually, a light dusting of the right shade, even during a casual day, can add freshness. The key is subtlety. When you work with the right undertones and blend well, you won’t look overdone.
Identifying Your Skin Undertone

Warm Undertones Explained
Do you notice golden or yellowish nuances in your skin? Do your veins sometimes appear green? If so, you likely have a warm undertone. Warm undertones look balanced with gold, peach, or copper tints. Think about the jewelry you wear—if gold jewelry tends to flatter more than silver, that’s a clue.
When you shop for a highlighter, you want to lean toward colors that enhance your complexion’s warmth. Shades like champagne, rose gold, or soft gold often look very natural on warm skin because they harmonize with that underlying golden hue.
Cool Undertones Explained
Cool undertones appear pink, red, or bluish. If your veins look more on the blue side, you might be cool-toned. People with cool undertones often reach for silver jewelry or cooler pastel clothes. Pale pink or icy lavender usually complements their skin.
For highlighting, options like pearly white, icy pink, and soft opal can work wonders. You’ll see a clean, bright effect that doesn’t conflict with the skin’s pink or blue base.
Neutral Undertones Explained
Neutral undertones hold a balance of warm and cool. Sometimes veins look half-green, half-blue, or jewelry in gold and silver both complement equally. Neutrals can enjoy a wide range of highlighter shades, from pearly pink to golden champagne, without looking off.
If you’re neutral, you might try layering different highlight colors to see which effect you prefer. A pinkish highlighter can add a gentle flush. A champagne tone can lean either warm or cool, depending on the brand. Experiment, see what resonates, then adjust as needed.
Fair Skin Tones: Best Highlighter Choices

Pearl and Icy Highlights
Fair skin often pairs best with lighter highlighter shades. Pearl, icy pink, or subtle opal can create an ethereal glow that blends in well. If you’re extremely fair, you might want to avoid anything with too much gold or bronze because it might show up as a harsh streak.
Imagine you have porcelain skin and you dust a shimmering ivory highlighter across your cheekbones. You’ll look lit from within. Seek out finely milled formulas that won’t appear glittery or chunky on delicate fair skin.
Subtle Shimmer for Everyday
Fair skin can turn sparkly fast if the formula has large reflective particles. A soft sheen looks more natural for everyday wear. Think about picking up a highlight that’s more on the satin side. This way, you avoid the disco-ball effect.
Try swirling a small fluffy brush into a pearly powder and gently sweeping it on. Build the intensity, rather than packing on too much in one go. If you notice any visible shimmer specks, you can buff them in with a clean brush or a bit of setting powder for a softer finish.
Amplifying Color for Special Events
Sometimes you want a bit more pop. In that case, a slightly pinker or lilac highlight can add drama for a night out. If you’re worried it’ll look frosty, dab it onto the high points of your cheeks with your ring finger and blend. That technique warms up the product so it melds with your base makeup.
For photos, avoid going too heavy on white-based highlights since flash photography might create an ashy look. Balance your highlight with a soft blush or contour for depth.
Light to Medium Skin Tones

Choosing Champagne or Rose Gold
Light to medium complexions can often handle a broad range of highlight tones, but champagne or rose gold is typically flattering. Champagne strikes a nice middle ground—it’s not stark white, and it’s not too gold. Rose gold infuses a gentle warmth that doesn’t lean orange.
When you test these shades in-store, look at them in different lighting. Natural daylight tends to reveal whether a highlight leans too gold, too pink, or just right. If you see a slight pinkish shift in rose gold highlighter, that can look sweet on lighter and medium complexions.
Building Dimension
If you want that sun-kissed glow, try layering a neutral bronzer under your highlight. Lightly sculpt your cheekbones, then tap a champagne highlight on the highest point. This multi-dimensional approach helps your cheekbones pop without appearing flat.
Another tip is to add a tiny dab above the brow arch to brighten the eye area. A little highlight on the inner corner of your eyes can also widen and illuminate. Light to medium tones benefit from these gentle lifts because they bring brightness without stark contrast.
Avoiding Over-Shimmer
Use a medium, tapered brush or a smaller highlighting brush, so you don’t deposit too much product at once. If you accidentally go heavy-handed, buff away excess with your usual face powder. Buffing merges the highlight with your skin, which keeps it from looking like a separate, metallic stripe.
If you prefer a cream formula, warm it between your fingertips and tap lightly. This method helps keep the finish natural, especially if you have a lot of dryness or fine lines. Cream formulas can sit better on normal to dry skin and look more dewy than sparkly.
Olive Skin Tones

Golden Glow
Olive skin often has a greenish or yellowish undertone. A golden highlight can amplify that subtle warmth and create a radiant effect. Think about using a champagne gold that leans a bit deeper or a pale golden bronze to match the richness of your skin. You don’t want something too pale that might read as chalky.
A gold-toned highlighter blends seamlessly with your complexion, giving it that “lit from within” vibe. If you want something bolder, you could try a slightly rose-gold formula, though be careful with pink undertones if you lean strongly olive, since it can clash.
Using Peach and Warm Pink
Peach and warm pink highlight shades can look surprisingly flattering on olive skin. They add a fresh flush of color, while still highlighting the high points of your face. If you worry about too much pink, test it on the back of your hand. Look for a color that seems to sink into your skin, not float on top.
If you find a peachy highlight with a golden reflect, that’s often the sweet spot for olive tones. It creates a youthful glow and warms up the face, especially when paired with a bronze eyeshadow or warm-toned blush.
Balancing with Contour
When you highlight, also think about your contour and blush. Olive skin can handle a soft, neutral contour shade without leaning too gray or orange. After contouring, place your highlight right above it, blending to avoid harsh lines. The highlight color shouldn’t interrupt the contour’s effect; it should enhance it.
If you feel uncertain about color placement, try using a small fan brush. Lightly sweep your chosen highlighter along the top of the contour, letting the brush do the blending. This approach helps you see where the shimmer lands before you build more intensity.
Tan Skin Tones

Bronze-Based Highlights
Tan skin can look breathtaking with a bronze-based highlighter. This creates a seamless transition between your natural color and the highlight. It’s like capturing that perfect summer glow, even if you aren’t on vacation. Look for soft bronze or caramel-toned highlights that don’t look muddy.
Sometimes, powders labeled “bronzer-highlighter duo” are perfect for tan complexions. They often contain a balanced shimmer that complements tan skin and adds warmth without turning orange. If you’re trying one for the first time, swatch it under various lights to ensure it works in both daylight and indoor settings.
Soft Gold Options
Not a fan of deeper bronze? You can go for a soft gold highlight that leans lighter, but still has enough yellow to mesh with your tan undertone. Avoid anything too pale that might leave a silvery cast. If the highlight looks stunning in the pan but turns frosty on your face, that’s your signal to try a richer gold.
In some cases, layering a lighter gold highlight on top of a very sheer base of bronzer can warm up the shade enough to complement your tan complexion. That way, you get the brightening effect without a stark, chalky line.
Enhancing Natural Warmth
Tan skin usually has built-in warmth. Highlighter can push that warmth to the surface for an effortless glow. If you want more drama, consider a highlighter with a slight metallic finish. Metallic formulas often ramp up reflectivity, giving a bold result suitable for night-outs or special events.
If you want a more subtle look, stick to satin or soft shimmer finishes. These reflect light in a gentle way, which looks polished for everyday life. And remember, less is often more—start small, then layer as needed.
Deep Skin Tones

Rich Copper and Bronze Picks
Deeper skin tones typically shine with copper, bronze, or even golden-bronze highlighters. These colors accentuate the warmth already present in deeper complexions and avoid that ghostly effect you get from lighter highlighters. Look for formulas designed specifically for deeper shades, since they often have a richer pigment base.
Powders, creams, and liquids all exist in deeper tones. A copper or bronze hue might seem like a bronzer to someone with fair skin, but for you, it can serve as a perfect highlight. Test it along your cheekbone in natural sunlight to see if it blends well.
Contrasting with Cool Shimmer
A trick for deeper skin: sometimes a cooler highlight can create a striking contrast if used carefully. For instance, a rose gold that leans more pinkish or even a deep champagne with a bit of platinum reflect can produce a dramatic pop. The key is to pick a formula that remains pigmented enough to avoid that dusty effect.
Pair your cool shimmer highlight with warm blush or contour to keep balance. This interplay of cool highlight and warm base can create a multi-dimensional glow that stands out in the best way.
Avoiding Chalkiness
Chalkiness often happens when a highlighter is too light or lacks enough base pigment for a deeper complexion. Look for a brand that includes inclusive highlighter ranges. Always watch out for ashy undertones. If you swatch something and it leaves a white cast, it’s not the right choice.
To minimize any chalky appearance, apply the product sparingly and blend with a dense brush or a damp sponge. This technique presses the highlight into your skin rather than letting it sit on top in a powdery layer.
Dark Skin Tones

Vibrant Gold and Plum
Dark skin can handle bold highlight shades like vibrant gold, deep rose gold, or even a subtle plum. These colors harmonize beautifully with the richness of your complexion. If you want an everyday highlight, a deep gold with a warm base might be your go-to. But don’t be afraid to try something like a plum highlighter that shifts to rose gold in the light.
Test a small amount on your cheekbone, let it settle, then check how it appears after a few minutes. If it looks seamless and glowing, that’s a winner. If it leans gray, keep searching for one with a richer base color.
Highlighting with Metallic Finishes
Metallic highlights can look striking on dark skin. Many deeper complexions can carry that luminous gleam with style. Think about a metallic bronze or copper that glistens when it catches the light. For extra drama, you could even layer a softer highlight below and then top it with a metallic one on the highest point of the cheek.
When using metallic formulas, a little can go a long way. If you don’t want an intense shine, try blending it out with a fluffier brush. For a bolder effect, use a denser brush or your fingertips to press the product onto your skin.
Creating a Radiant Contrast
A highlight that’s one or two shades lighter than your skin tone creates a noticeable but flattering contrast. Avoid going several shades lighter, which can result in a grayish cast. If you crave something that stands out, pick a highlight with strong pigment that also has a warmer base to it, such as a gold-infused copper. That ensures a radiant shift instead of an ashy line.
If you’re using a liquid formula, apply a thin layer and blend fast so it doesn’t set unevenly. Liquids often give a smooth, reflective finish that pairs well with the deep richness of darker skin.
Application Techniques

Tools (Brushes, Sponges, Fingers)
You can apply highlighter with a fan brush, a tapered highlighter brush, a damp makeup sponge, or even your fingers. Each method yields a slightly different outcome. A brush often diffuses shimmer more softly, while a sponge can press the highlight into the skin for a seamless finish. Fingertips can offer better control if you enjoy a targeted placement.
Wondering which tool is best for you? Try them all with a single product to see which approach is most comfortable. If you feel the highlight isn’t blending well, you might need a different brush shape or a fluffier brush that’s not too dense.
Placement on the Face
Common highlight areas include the tops of the cheekbones, brow bones, the bridge (or tip) of the nose, and the cupid’s bow above your lip. Some folks also dab a touch on the chin or collarbones for extra glow. The strategy is to place highlighter wherever light naturally hits.
But don’t overdo it. Too much shimmer on the nose or chin can look greasy in certain lights. If you have texture on your cheeks, you might prefer focusing the highlight on the outer cheekbone to avoid drawing attention to uneven patches.
Layering Cream and Powder
One advanced technique is layering a cream or liquid highlight under a powder highlight. This creates an amplified shine that’s more long-lasting. However, practice caution: layering can accentuate texture if you pile on too much. Always blend each layer thoroughly.
For instance, place a thin layer of liquid highlight on your cheeks, let it set, then lightly dust a coordinating powder highlighter over it. This method can intensify the glow for photos or special occasions. Just remember to keep the coverage under control, so your look remains polished.
Skin Prep for a Lasting Glow

Exfoliation and Moisturizer
Highlighter clings to texture. If you have dry patches or flaky skin, shimmer will emphasize them. A gentle exfoliation routine can help. Buff away dead cells with a mild scrub or chemical exfoliant, then follow up with a nourishing moisturizer. This smooth base lets highlighter glide on evenly.
Try to exfoliate the night before a big event, rather than right before applying makeup. That way, any redness has time to calm down. If you have sensitive skin, choose a gentle formula and keep an eye on how your face reacts.
Primer Selection
Primers designed for hydration or radiance can enhance your glow. A luminous primer applied to the cheekbones and T-zone can act as an underlayer that amplifies your highlighter. If you have oily skin, a mattifying primer in your T-zone plus a radiant primer on your cheeks might give you balanced results.
Pick a primer that won’t clash with the finish of your foundation. If your foundation is already dewy, adding another dewy product on top can look greasy. If your foundation is matte, a radiance primer on the high points might add a nice contrast.
Setting Spray Tips
A setting spray helps lock your makeup in place so that highlight doesn’t fade by midday. Spritz your face in an X and T pattern after you’ve finished applying your makeup. Let it dry naturally without touching your face. The fine mist can also soften any powdery look.
If you really want extra luminosity, look for a glow-enhancing setting spray. It usually contains light-reflecting particles or hydrating ingredients. Just make sure it doesn’t leave visible glitter on your face. Subtle illumination is usually more elegant.
Highlighting for Different Occasions

Daytime Subtle Highlight
For a regular workday or a casual outing, a delicate highlight can brighten your face without drawing too much attention. Opt for a satin finish or a very finely milled powder that appears like healthy skin rather than a shiny stripe. Choose a shade close to your skin tone so it blends in seamlessly.
A small fan brush or a fluffy eye brush can deliver a soft glow. Concentrate on the outer cheekbone, then lightly sweep over the brow bone. You can skip highlighting the nose or cupid’s bow if you want it extra subtle.
Evening Glam
When nighttime arrives, you can turn up the shine. If you’re planning to take pictures or attend an event, layering your highlight or using a bolder shade can make a statement. Metallic or high-shine formulas capture and reflect artificial light better, giving a more dramatic glow.
Combine a golden or rose gold highlight with a smoky eye for a sultry look. Or pair a soft pearl highlight with a bright lip if you want balance. The idea is to decide which feature you want to showcase—eyes, lips, or cheeks—and let your highlight complement that focus.
Festival or Special Event Sparkles
Want something playful for festivals? You can experiment with colored highlighters like lavender, holographic pink, or even electric blue. These might sound wild, but at a music festival or themed party, it can be fun. Sweep the colored highlighter on your cheeks, temples, and even collarbones for a whimsical glow.
Just remember, these colors might look too bold for everyday wear. If you’re uncertain, do a test run at home. Check how it looks under different lighting, especially if you’ll be in the sun or under stage lights.
Pairing Highlighter with Other Makeup

Foundation Matching
Highlighter sits best on a well-blended foundation (or tinted moisturizer) that matches your skin tone. If your foundation is too light or too dark, the highlight might look off. Also, consider the finish of your foundation. A matte base pairs well with a luminous highlighter to create contrast, while a dewy base plus luminous highlight can sometimes look too shiny for certain preferences.
If you prefer a minimal approach, you might skip foundation altogether and spot-conceal areas that need coverage. A little highlighter on bare, healthy skin can look fresh and effortless.
Blush and Bronzer Synergy
Highlight, blush, and bronzer often work together. A cohesive color scheme ties the face together. If your highlight leans warm, pick a blush or bronzer in a similar family so nothing looks mismatched. For instance, if you’re using a rose gold highlight, a peachy-coral blush could harmonize. If your highlight is a cool pearl, a soft pink blush might complete the picture.
Some people like to place blush first, then highlight just above it. Others prefer highlight first, then a light layer of blush to blend the two. Experiment to see which arrangement gives you that seamless gradient from cheek to highlight.
Lip Color Coordination
While lip color may not seem directly related to highlighter, it can influence the overall vibe. A bold lip might call for a more balanced highlight, so you don’t have too many focal points on your face. On the other hand, if you’re going for a nude lip, a powerful highlight can stand out in a stylish way.
If you plan to wear a cool-toned lipstick like a deep berry, a highlighter with a hint of pink or silver might connect the look. For a warm-toned red or orange lip, a gold or rose gold highlight usually ties in nicely.
Common Highlighter Mistakes
Over-Application
Piling on too much product can lead to an unnatural metallic stripe. If you notice a visible line, try blending it out with a clean brush. Sometimes, a soft buffing motion with your usual face powder can diffuse the edges. Think of highlighter as a finishing touch. A little pop of shimmer often looks more sophisticated than an intense, unblended swath.
Another mistake is reapplying throughout the day without checking a mirror in bright lighting. Always verify how your face looks from various angles before adding more highlight. You might need a quick powder pat in the T-zone instead of extra shimmer.
Wrong Undertone
Choosing a highlighter that clashes with your undertone can result in a gray or ashy cast. For warm skin, a highlight that’s too cool can look icy. For cool skin, a strong gold can appear yellowish. Matching your highlight undertone to your skin or going for a neutral tone usually works best.
If you really like a certain color that doesn’t match, you can sometimes mix it with a warmer or cooler product. For example, blend a tiny bit of warm liquid illuminator into a pink highlight if it seems too frosty.
Not Blending Enough
Harsh lines kill the natural glow effect. Highlighter should meld with your base, not sit awkwardly on top. If you see an obvious patch of shimmer, keep blending or switch tools. A smaller, more precise brush might help you target the right spot without scattering shimmer everywhere.
Also, watch where the product ends. Some folks stop blending too soon, causing a shimmer edge near the center of the cheek. That abrupt line can catch the eye in a distracting way. Softening it with gentle buffing ensures a more polished appearance.
Selecting the Right Formula

Powder Formula Pros and Cons
Powder highlighters are user-friendly and common. They’re great for people who want a quick dust of shimmer on the cheekbones. If you have oily or combination skin, powder formulas often stay put better than creams under hot or humid conditions. They also come in a wide variety of shades.
However, powders can emphasize dry patches or fine lines if you’re not well-hydrated. A heavy hand can create a chalky layer. And if you apply too much in one spot, blending it out might require more effort than a cream would.
Cream Formula Pros and Cons
Cream highlighters often yield a dewy finish that suits normal to dry skin. They can melt into the skin beautifully, offering a second-skin glow. Application can be done with fingertips, which many find convenient. A cream formula is also great for layering under powder highlights if you crave extra intensity.
The downside? Creams can sometimes slip on oily skin or in hot climates. They might break down your foundation if you rub them on too firmly. Also, they might not last as long as powders unless set with a bit of translucent powder or a matching powder highlight.
Liquid Formula Pros and Cons
Liquid highlighters are versatile. Mix a drop into your foundation for an all-over radiance or apply directly to high points for a targeted gleam. They often provide a buildable glow, from subtle to dramatic. They can also blend seamlessly if you use a damp sponge.
Yet, liquids can be tricky for beginners. They dry quickly in some cases, so you have to work fast. Too much product can lead to a patchy finish or streaks. You also need to ensure the liquid formula doesn’t separate your base makeup. Always test a small area first.
Conclusion

Highlighter can be transformative, but it demands an understanding of color, undertone, and technique. Warm skin tones usually bask in golden or peachy shades, while cool skin might prefer icy pink or pearl. Neutral folks get to explore both directions. Fair complexions benefit from lighter, more delicate hues, and darker complexions come alive with deeper gold and copper reflections.
Prepping your skin is crucial. Exfoliate gently, hydrate well, and use products that promote a smooth canvas. When you’re ready to highlight, pick the right tool—brush, sponge, or fingertip—so you can tailor the application to your liking. Placement matters, but so does undertone matching. If you go off-tone, you risk a grayish or washed-out effect.
Stay mindful of events and lighting conditions. A daytime meeting might call for a soft glow, whereas a nighttime party might inspire a dramatic metallic finish. Above all, keep experimenting. Makeup is about personal expression, so don’t hesitate to try new shades or formulas. With practice, you’ll find highlighters that perfectly illuminate your unique face.
Summary Table

| Skin Tone | Recommended Highlighter Colors | Best Formulas | Key Tips |
|---|---|---|---|
| Fair | Pearl, Icy Pink, Subtle Opal | Fine Powder, Cream | Choose very light shades, blend well for no white cast |
| Light-Medium | Champagne, Rose Gold | Powder or Cream | Avoid over-shimmer, focus on natural glow |
| Olive | Golden, Peach, Warm Pink | Powder or Liquid | Match olive warmth with gold-infused or peachy tones |
| Tan | Bronze, Light Gold, Caramel Undertones | Powder or Cream | Avoid pale shades, layer lightly for a sun-kissed effect |
| Deep | Copper, Bronze, Cool Shimmer Contrasts | Powder or Cream | Seek pigmented formulas that won’t look ashy |
| Dark | Vibrant Gold, Deep Rose Gold, Plum Undertones | Metallic Powder or Cream | Embrace bold contrast, ensure no chalky residue |
FAQ

Q: Can I wear highlighter if I have texture or acne scars on my cheeks?
A: Yes. Pick a finely milled or satin-finish highlight. Avoid chunky glitter that can highlight bumps. Apply lightly, then blend or buff. You can also restrict the glow to spots where you don’t have as much texture, like brow bones or temples.
Q: Do I need different highlighters for summer and winter?
A: Not necessarily, but you might enjoy adjusting your shades. Your skin color can shift slightly with sun exposure. If you notice your usual highlight looks too light or dark, try a different hue that complements your current tone.
Q: Are colored highlighters like lavender or blue wearable for everyday looks?
A: They can be, but most folks reserve these whimsical tones for special events or festival settings. If you do want to wear them daily, apply a small amount and blend thoroughly so the color shift is subtle rather than intense.
Q: How do I keep my highlighter from fading too quickly?
A: Start with a well-prepped base (primer, foundation, or tinted moisturizer). Apply your highlighter, then gently set it with a bit of translucent powder or a setting spray. Layering cream or liquid under powder can also extend wear time.
Q: Should I highlight my nose and cupid’s bow?
A: It’s personal preference. A little highlight on the bridge or tip of the nose and the cupid’s bow can look nice. But if your nose is an area you’d rather not emphasize, skip it. Experiment in front of a mirror and see which look you prefer.
Q: Which is better for beginners: liquid, cream, or powder highlighter?
A: Powder highlighter is usually the easiest for beginners. It’s more forgiving and simpler to layer or buff out if you make a mistake. Liquid and cream formats can look wonderful once you’re comfortable blending them.
Q: Can I mix my highlighter with foundation?
A: Yes, if you want an overall glow. Add a small drop of liquid illuminator to your foundation. This step will give you a luminous finish. Just remember that too much can turn your entire face shiny, so start with a tiny amount and adjust as needed.
Use these tips as a guide and feel free to try new tricks. A thoughtful highlighter application can bring fresh energy to your look. With a little care in selecting colors, formulas, and techniques, you can glow with confidence—whatever your skin tone may be!
Brenda Tillman is a color maestro who brings artistic brilliance to every piece she crafts. Passionate about imaginative expressions, she illuminates the world of fashion with her expert guidance on shades and combinations. Beyond her writings, Brenda is a culinary enthusiast and a global traveler, infusing her work with diverse insights. Her unique touch transforms simple color choices into art.
Reviewed By: Joanna Perez and Anna West
Edited By: Lenny Terra
Fact Checked By: Matthew Mansour
Photos Taken or Curated By: Matthew Mansour
